Diana's friend bought a kit to make a crib-sized minkie quilt (40 x 46), which Diana pieced for her. They decided to nix the batting, making it a coverlet, which I stitched together with an overall meandering design to secure the top and back layers. Without a layer of batting which adds stability, I had to lower the presser foot tension on my sewing machine to avoid skipped stitches.
Saturday, April 24, 2010
Minkie Coverlet
Diana's friend bought a kit to make a crib-sized minkie quilt (40 x 46), which Diana pieced for her. They decided to nix the batting, making it a coverlet, which I stitched together with an overall meandering design to secure the top and back layers. Without a layer of batting which adds stability, I had to lower the presser foot tension on my sewing machine to avoid skipped stitches.
Tuesday, April 6, 2010
Preparing to quilt Andrea's feedsack quilt
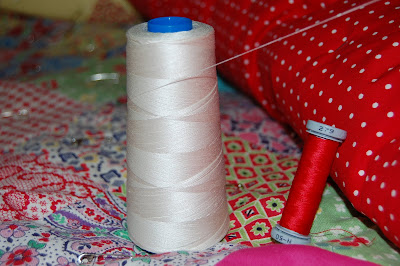
Ah, I love red. This backing fabric (white dot on red, right) for Andrea's feedsack quilt is Mama's Feedsacks line by Darlene Zimmerman for Robert Kaufman fabrics. It is the perfect match to the 1930's red feedsack pieces in this quilt. What's even better is finding the exact matching thread (100% cotton, 50/3, #279 red) by Presencia (http://www.presenciausa.com/). I only had the small spool to fill a couple of bobbins but it's available in a 125 gram cone, just delivered to my doorstep by UPS. So I'm off and running.

For the top thread, I'm using Presencia's winter white #206. I like to use an off white rather than pure white for most vintage style quilting. I'm using a walking foot to stitch in the ditch to secure all the seams. Here's how I go about balancing the tension so the red doesn't show up on top and the white doesn't pull to the back.
Last time I was sewing something, I had polyester thread in the bobbin which requires a tighter bobbin tension--polyester thread is smooth and slick so if the tension is too loose, lots of loops will show underneath. When switching to the cotton thread I'm using now, I had to loosen the bobbin thread and also adjust the top thread tension. I go through a series of different settings and mark my test fabric with a pencil to see which # is the one to go with. Here, I had the best results with a top thread tension of 2.

To avoid getting small tucks in the backing fabric, I use a straight pin to secure the intersections which stitching-in-the-ditch. This is very effective is keeping the backing fabric from bunching up. I keep a couple of pins in the square I'm quilting and keep moving them down as I go. The safety pins are for basting the quilt layers and I keep them in until all the stitching-in-the-ditch is completed. Additional quilting can be done without safety pins because they have done their job and the quilt will be light, yet secure, to handle.

Copyright ©2010, Sharon Baggs
For the top thread, I'm using Presencia's winter white #206. I like to use an off white rather than pure white for most vintage style quilting. I'm using a walking foot to stitch in the ditch to secure all the seams. Here's how I go about balancing the tension so the red doesn't show up on top and the white doesn't pull to the back.
Last time I was sewing something, I had polyester thread in the bobbin which requires a tighter bobbin tension--polyester thread is smooth and slick so if the tension is too loose, lots of loops will show underneath. When switching to the cotton thread I'm using now, I had to loosen the bobbin thread and also adjust the top thread tension. I go through a series of different settings and mark my test fabric with a pencil to see which # is the one to go with. Here, I had the best results with a top thread tension of 2.
To avoid getting small tucks in the backing fabric, I use a straight pin to secure the intersections which stitching-in-the-ditch. This is very effective is keeping the backing fabric from bunching up. I keep a couple of pins in the square I'm quilting and keep moving them down as I go. The safety pins are for basting the quilt layers and I keep them in until all the stitching-in-the-ditch is completed. Additional quilting can be done without safety pins because they have done their job and the quilt will be light, yet secure, to handle.
Copyright ©2010, Sharon Baggs
Friday, April 2, 2010
Cross stitch quilts
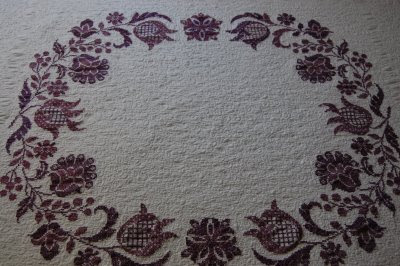
This is a pre-printed cross stitch quilt that was cross-stitched by Bonnie and quilted by Heather. My job was to wash out the blue lines and bind the quilt. We had worked together on a quilt like this one before and the ink washed out easily; however, this time the ink set and I spent a lot of time trying to figure out how to remove the ink, or at least lighten it.
 The ink was mainly visible in the center of the quilt where curled designs were quilted instead of the pre-printed x-stitch designs and some dotted lines.
 My attempt to remove them resulted in only lightening the x's and dots. I did this by mixing a solution of baking soda, a few drops of Synthrapol (which contains Isopropyl Rubbing Alcohol) so I added a couple more drops of rubbing alcohol to the solution and gently scrubbed it in with a toothbrush. Then I let the quilt soak in lukewarm water for 1-2 hrs., spun out the water and rinsed. I avoided heavy agitation of the wash cycle. I also read the suggestion to use Oxo Brite non-chlorine bleach. I tested this on a small area of the quilt and it didn't seem to lighten the dye. However, if left to soak for a time, it might be effective.
 After a 20-minute dry cycle on warm, the slight shrinkage from the washing/drying process made the background recede and the quilting to be more visible. At first glance the remaining blue dye was not noticeable. Bonnie was very satisfied with the results and appreciated the care taken to wash out the unwanted dye. It definitely looked better than it did after the intial wash that removed none of the dye.
My suggestion with these pre-printed cross stitch kits is to stick to the quilting design given so you can go over the lines. There is no guarantee that the dye will be removed. Test first if you want to use an alternate quilting design.
Copyright ©2010, Sharon Baggs
My suggestion with these pre-printed cross stitch kits is to stick to the quilting design given so you can go over the lines. There is no guarantee that the dye will be removed. Test first if you want to use an alternate quilting design.
Copyright ©2010, Sharon Baggs
Subscribe to:
Posts (Atom)