Saturday, December 27, 2008

Quilt as you go

I've been having a little fling with quilt-as-you-go. This is an old school technique designed to handle the quilting in small sections. I learned this technique to make this Log Cabin quilt for someone who constructed with this method. She had all the strips and batting squares cut out ahead of time so it seemed it would be fast and easy. It actually took me much longer to make a quilt this way, but here's what I learned.


Rather than layer a top with batting and backing, the block is quilted directly onto the batting, as a foundation, during construction. I found I needed an acrylic ruler to keep the strips in line while adding them or the squares didn't come out quite right.


Once the blocks are constructed, they are sewn into strips, then sewn to the backing. This is where I ran into some trouble. There was too much slack on the back, so I removed the stitching. Instead I continued to sew fabric and batting together until the top was completed. Then I layered the top/batting to the backing.

For the quilting I stitched-in-the-ditch through all the construction lines and borders. I added quilt lines around the center green block and quilted in a square a couple of seams away from that. Really simple quilting with a walking foot and it turned out well.

Another quilt-as-you-go method involves stitching all three layers together block-by-block, then sewing them together.

I faced a bit of a quandary when binding this quilt. I had to use what fabric was trimmed away from the back. I cut 2" strips from all the remaining fabric and ended up just 3" short of enough. What to do? I decided to sew together two short strips 1-1/8" x 6" to make a 2" wide strip When I pressed them in half, the seam line was on the fold that was handsewn to the back. Easy to disguise and a good solution when you don't have enough fabric in the width you need--piece them!


Copyright ©2008, Sharon Baggs

Sunday, December 21, 2008

Leaf designs to quilt

Ah, the beautiful leaves of fall, now all sittin' under seven inches of snow and ice outside. Winter has arrived! But severe weather outside allows you to be inside and work on some free motion designs, provided the electricity is still on...


Use a white board with a dry erase marker or a pencil with your sketch book. Begin with a simple arc, elongated s-curve, drawing a small hill and then going down into the valley until you reach a point. Easy, right?


Now head back the other way with another arc until you reach the starting point...basic shape accomplished. If you can draw this, you will be able to quilt it even better.


Add a vein by drawing up the center to the tip of the leaf and retracing the line back to the starting point. When you quilt this center vein, the retracing doesn't have to be exact. In fact, it will look great if you stitch a bit away from it, about a 1/8" echo line.


Quilting the basic leaf shape, add in veins, maybe echo around the shape, then once you have one leaf quilted, go on to the next by quilting a meandering line to an open area where you can stitch another basic leaf shape, repeating the process.


When I quilt these leaves in a block, say as a background fill, I will begin my securing stitches in the seam line, then begin quilting a short meandering line. Add leaves, meandering in between, until the space is filled. Return to a seam line to secure the final stitches.

I have a few little journals where I sketch out a basic design. It's not to be an aspiring artist...it's how to train my brain to follow the lines. Then I'm prepared to quilt lines, curves, and swirls with needle and thread on my sewing machine.

Copyright ©2008, Sharon Baggs

Monday, November 17, 2008

Fall Leaf Project

I've been wanting to create a design to remember the beautiful fall leaves. I pulled some appropriate colors of 50 wt. Presencia thread to support the quilting, along with a few leaves for inspiration. This is the mulling-it-over stage, an important part of figuring out what to do next.

Sarah made this card for my birthday, knowing how much I love the leaves on her college campus. I'll never recycle this one. When I went to visit her last week, she had tacked leaves all around her dorm door. Crazy creative girl. This got me thinking about this project again...

When in doubt, toss it all together. Leaves are a most interesting shape to quilt. So much variety! Try sketching an arc to form one side of the leaf, come up to a point, then arc down the opposite side. Add a stem, then go inside the leaf and add veins. After a few drawing attempts, go to your fabric and stitch what you have taught your brain to do. Being 'artistic' is not required. Just follow the lines nature has shown you, keeping a sample within eyesight as you quilt. If your shape looks anything like a leaf, you're doing great. I definitely stitch better than I draw but the pencil work is an important precursor to quilting. Get your sketch book out and try it.

Copyright ©2008, Sharon Baggs

Thursday, November 6, 2008

Spectacular Spectrum

Color can intimidate. But look at nature, an obvious place to start. A myriad of brown, green, yellow, orange and blue dictate color choices. You can't go wrong. My little neck of the woods, Portland, has been more gorgeous than ever this fall. Chalk it up to a long stretch of sunny days that brilliantly illuminate creation's vibrant palette. Who wouldn't want to wrap up in these rich autumn hues? Time to pull out these colors from your fabric stash before the cool blues, grays and whites of winter set in. Go make a quilt.

Copyright ©2008, Sharon Baggs

Tuesday, October 28, 2008

Using the washable blue marker

I love the washable blue marker. If you follow some basic guidelines it will work a charm everytime. The basic ink is produced in Japan, then packaged through different manufacturers. I like Dritz's Mark-B-Gone and Clover's Water Soluble Marker (Thick) for marking through stencils. For marking grids, I use Clover's thin version or the Water Erasable Fabric Marking Pen.

Some pens come with a blue water soluble marker at one end and a white eraser pen at the other. This is helpful when you need to remove a marked line in a small area. For larger areas, wet a paper towel with COLD water to lift the markings. You must wait for the fabric to dry before marking again or it will not hold the mark.
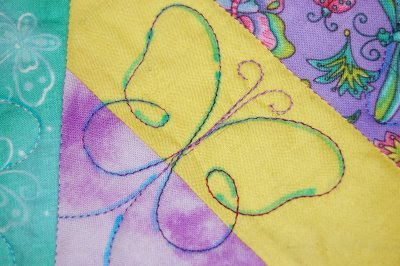
Never apply heat to blue washable markers or the ink can set and may reappear as brown lines. Mark with a light touch; the less ink you have to remove the better. Plan to mark, quilt, and remove the ink as soon as possible for best results.

When quilting and binding is complete, submerge the quilt in COLD water. I use the bathtub for this step so I can see the lines disappear! Either continue to hand wash with a bit of Quilt Soap or Orvus Paste (Sodium Lauryl Sulfate) in the tub or use the washing machine. Remove excess water by rolling up in a terry towel or use the spin cycle of the washing machine. Lay the quilt flat to air dry or use the clothes dryer on a low setting for a few minutes. Finish with air drying.

Copyright ©2008, Sharon Baggs

Friday, October 24, 2008

Spray and blot

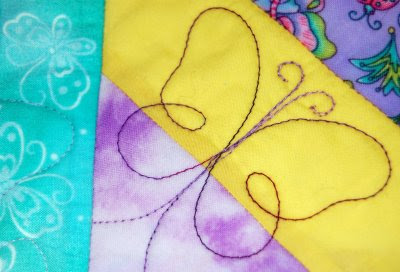
On the butterfly quilt I was curious what the thread looked like apart from the blue marking. I decided to use a "spray-and-blot" method to remove some of the blue marks. Complete removal comes later after binding.


Using a spray bottle of COLD water, saturate the blue lines.


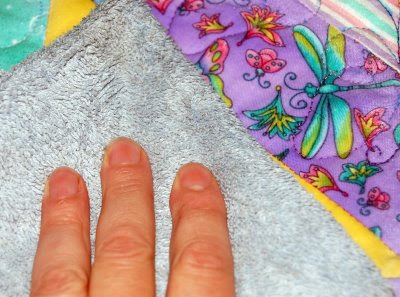
Blot up the excess water/diluted dye with a terry towel.


When using the spray-and-blot method, it's important to dilute the blue dye as much as possible; a slight spray only temporarily fades the lines as the dye migrates into the batting. Traces of blue usually show up when the fabric dries again.

After binding, the quilt should be completely submerged in cold water to remove any remaining dye. Hand wash in the tub or in the washing machine with a bit of Orvus Paste (sodium lauryl sulfate), rinse, spin and dry on low for 5-10 mins. Lay the quilt out flat to finish air drying.

Copyright ©2008, Sharon Baggs

Tuesday, October 21, 2008

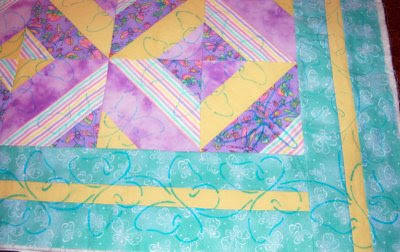
The butterfly quilt


Here is a fun quilt made by my friend, Diana. She came over to get some machine quilting tips, then decided to let me quilt it for her. The focus fabric features butterflies with a few dragonflies in the mix. Fortunately, I had stencils of both creatures on hand which made design choices easy.


Using a blue washable marker, the top was marked with a 7" butterfly continuous line design (RB42-Promise) in the center of each block. Tendrils were added free form during the quilting. Next I marked a dragonfly in the four corners (http://www.timesavertemplates.com/) Finally the border was marked with a companion stencil of the blocks (RB45-4 1/4" Promise Border).

The next decision was the thread. I played around with Superior's Perfect Quilter (a 30 wt. cotton) and kept getting skipped stitches no matter which needle I tried. Then I put in YLI Machine Quilting Thread (40wt. TEX, cotton) in both the top and bobbin and used this thread to quilt the blocks. This worked best with a 75/11 embroidery needle, which is a smaller needle but has a larger eye like a topstitch needle.


The other thread I used was Presencia 50/3 Color #261--light lavender on top and YLI in the bobbin for stitching-in-the-ditch and quilting the border.

The order of quilting: First stitch in the ditch through the diagonal seam lines, using a walking foot. This avoids stitching over any markings. Next stitch in the ditch along the inside border, all around the perimeter.

Next the internal blocks of butterflies and corner dragonflies were free motion quilted with a darning foot. Finish by quilting the outer border.


Copyright ©2008, Sharon Baggs

Sunday, October 19, 2008

Pink Quilt Finished!


A finished quilt is always a cause for great rejoicing. The pink quilt made its way across the street to 2-year-old Rose who was delighted with it and has been toting it out of the house and into the car according to her observant and proud neighbors.

Hannah tried free motion quilting, first on a practice piece. After a couple of minutes she said, "This takes practice!" But she kept on, writing her name and following the markings of a stenciled flower. She quilted Rose's name on the quilt near the top and I did the same at the bottom. She did a great job and demonstrated an I-can-do-it attitude which is imperative when approaching the art of free motion quilting.


Using a darning foot, I added some free-motion stitch-in-the-ditch around the green lines to get them to lie down flat and not pop up.


After the binding was on, we submerged the quilt in cold water in the bath tub to remove the blue water soluble markings. After a thorough rinsing, we took the quilt to the washing machine and spun out the excess water. At this point, we dried the quilt in the clothes dryer for just 10 minutes on a low heat setting. Hannah was somewhat surprised that the quilt had shrunk up a bit. This could be attributed to the batting more than the fabric, which I think was prewashed. Something to think about if you want a flat quilt with no compression around the quilting. Prewash fabric and soak the batting and dry on low heat to preshrink.


Copyright ©2008, Sharon Baggs

Thursday, October 9, 2008

Story quilt: the order of quilting

Hannah displays the progress on the pink quilt she pieced. Together we worked on the quilting. Here's what we did:


We domestic machine quilters "stitch in the ditch" to secure the seam lines before free motion quilting. A ditch is created by pressing seams to one side resulting in a high side and a low side. Use a walking foot and stitch so the machine needle sinks right into the low side of the seam. If seams are pressed open, stitching in the ditch is difficult because there is no ditch.

After using the walking foot for the first quilting lines in the ditch, I will sometimes switch to a different foot. The #10 foot for Bernina machines has an edge foot that rests right in the ditch. I used it here to stitch around the inner border.


After the grid of horizontal and vertical lines were quilted, stencil motifs of a butterly, flower, and heart were marked with a blue washable marker in some of the pink squares. After quilting and binding, remove the blue marking with COLD water.


A beautiful loopy heart border stencil fit this border perfectly. First I marked the corners and moved toward the center. Sometimes the spacing has to be eased in to make the design fit and sometimes it needs to be resized through reducing or enlarging the drawn design on a photocopier. This time it needed no altering. The variegated Mettler 100% cotton 50/3 used on top was paired with Presencia solid pink of the same weight and ply in the bobbin, stitched with a 80/12 machine needle. When you need to stop quilting and reposition your hands, it's best to stop where the design lines cross over, such as the bottom of the heart design, to insure a smooth stitching line.


A green binding was chosen to match the green story lines of the quilt. The strips were cut 2-1/4" on the straight of grain. Stitching the corner closed on both the front and the back keeps the corner crisp and neatly finished.


Copyright ©2008, Sharon Baggs

Sunday, September 28, 2008

Preparing to quilt the story quilt


Due to a lack of pink thread, this quilt has been sitting in the corner of the diningroom for several weeks, waiting for me to get it together. The backing and batting are 2-4" larger than the top, pinned away from the seam lines and ready to go!


Always, always, always make a couple of quilt sandwiches of the top fabric, batting, and backing fabric. This allows you to practice a bit o' quilting before getting to the real deal. Check tension, thread choice, and correct needle. Make adjustments and write the information right on these pieces so you'll remember next time: needle size, top thread, bobbin thread, tension setting, etc. Use the exact same batting that is in your quilt. For this quilt I chose Fairfield's Bamboo Batting (50% bamboo, 50% cotton). It has a scrim which means it doesn't have to be quilted to death and it will emerge from the wash without much shrinkage and puckering.


First thing I'm going to do is stitch-in-the-ditch with a walking foot and Presencia 50 wt. 100% cotton thread (color #269) in both the top and bobbin (pictured left). When I move on to free motion quilting with the darning foot, I plan to try out the Mettler 100% cotton variegated pink thread (color #9847) in the top while still using Presencia in the bobbin.


Copyright ©2008, Sharon Baggs

Thursday, September 4, 2008

Quilt from Modern Quilt Workshop


My 10-year-old wanted to make a quilt for our 2-year-old neighbor so we found this pattern from the Modern Quilt Workshop. It's a type of I-spy quilt using nostalgic prints; connecting blocks of horizontal, vertical and diagonal lines allow the pictures to tell a continuous story. The quilt was small enough to lay out on our kitchen table. First we put the backing fabric wrong side facing up, followed by a layer of bamboo batting (these are both 2-4" larger than the top), and smoothed the quilt top over these.


Starting in the center of the quilt, we used 1" safety pins to pin the center of every block. This bastes the quilt adequately while allowing room for your walking foot to clear the pins when you stitch-in-the-ditch to secure all the seam lines, the first step in quilting that anchors all three layers together.


Step two is to stitch through the middle of the green lines to give them some definition and keep them from "popping" up from the surface of the quilt. The final touch will be to free motion quilt some small loops in the pink background. The pink fabric has small dots so it is easy to quilt loops around them as a helpful visual guide. This is our quilting plan; we'll soon show you how it turns out!


Copyright © 2008, Sharon Baggs

Wednesday, August 20, 2008

Monofilament Thread: Nylon or Polyester?

When choosing monofilament thread, which type should be used: nylon or polyester? For stitching-in-the-ditch on bed quilts and outlining applique shapes, I use nylon--either Sew Art or YLI Wonder, available in clear or smoke. Use clear for light colored fabrics; smoke blends in well with medium and dark fabrics. I load my bobbin with a cotton thread, usually Presencia 50/3 or 60/3. Auriful 50/2 is also fine. The combination of nylon and cotton gives a good result.

Use a size 60 or 70 microtex sharp needle. Loosen the top tension and quilt a bit slower for successful feed along the thread path. To avoid thread wrapping around the vertical thread stand at the top of your machine, try standing it on the table at the back of the machine. Use a 2" piece of surgi-tubing and wrap that over the spool with the thread feeding out the top. This creates drag and keeps the thread under control. Superior Thread sells a plastic net product for the same purpose.

http://www.threadandmore.com/ProdImages/Sew%20Art%20Inv%20thread.jpg

Polyester monofilament is slightly more shiny, stretchy, and wiry than nylon but is still a good product, just different (see Superior's MonoPoly below). I used the clear in an art quilt where the shine was desired to highlight snowflakes. There is the point that polyester is more heat resistant than nylon (that statement infers nylon isn't heat resistant and should be avoided) but you need to consider how you are applying heat to your quilt. If working on an art quilt where you may be applying heat to the surface, even polyester thread will melt from direct contact with an iron. Quilts we sleep under encounter heat from a clothes dryer. Avoid the highest heat setting and your quilts containing nylon thread will emerge from the wash/dry cycle intact. No melting or popped stitches. Become your own expert by taking quilted swatches of each thread and see how applied heat affects each.

http://www.sew-ciety.com/images/products/thread/clear-smoke.jpg
Quality does count. Some brands of nylon and polyester threads are too heavy and strong; steer clear of threads that feel like fishing wire which can damage your fabric. Try breaking the thread. With a slight tug the thread should break easily--Sew Art, YLI and Superior brands all do. Lower quality threads, the "tough" stuff, can be used in art quilts that will not be going through a wash cycle. For bed quilts, however, a true .004 lightweight nylon thread is my thread of choice. See Heirloom Machine Quilting by Harriet Hargrave to view exquisite quilts made with nylon quilting thread.

Copyright ©2008, Sharon Baggs

Wednesday, August 13, 2008

Olympic Inspiration

http://www.moonbattery.com/archives/NBC-logo.jpgThese Olympics, from the precision of the Opening Ceremonies to the architectural design of both the Water Cube and Bird's Nest Olympic Stadium, plus the aesthetically pleasing color scheme and swirly designs on banners everywhere, have been nothing short of awesome. It was my intent to work on UFO's while watching Michael Phelps repeatedly win gold but so far I've just been viewing and not really sewing.

The Water Cube mimics the geometric design of soap bubbles and changes color which naturally appeals to our visual sense. The stadium reminds me of the retro craft of wrapping starched yarn around a balloon. This is wonderful imagery I don't want to forget.

http://www.cbc.ca/gfx/images/sports/photos/2008/05/05/water-cube.jpg

Even the NBC peacock has adopted a crayon colored plume, a bit more muted than the traditional bright colors. Take note of how design plays an important part in what we like to look at. Then during a commercial break, sketch some swirls in your notebook, capturing a memory of the magic surrounding Beijing 2008.

http://images.china.cn/attachement/jpg/site1007/20080418/000802c98ccc097295d52b.jpg


Copyright © 2008, Sharon Baggs

Friday, August 8, 2008

Using Decorative Threads

Glamour and glitz on the surface of a quilt is the result of using decorative threads. Technically, these are heavier than standard sewing thread. Some decorative threads can be threaded through the needle while others are too heavy and must be couched or drawn up from the bobbin.

For threads that can be threaded "through the needle" use either a size 80 or 90 topstitch needle. The topstitch has a larger eye and can accomodate most threads, including metallics. Other needles can work but the topstitch is usually successful. Try this: take a sewing machine needle and insert it upside down in a pin cushion. Thread the needle with a decorative thread and pull it back and forth to see how easily it runs through the needle; if it snags and the needle tries to tip over, try a larger size needle.

For threads that are too heavy for top threading, use them for couching or bobbin drawing. For couching, load the top thread with either invisible monofilament thread or a neutral fine polyester that will blend with the thread, cord, or yarn that is being couched onto the fabric. A couching foot for your machine will help feed the thread to the surface of the quilt while the top thread zig zags over the top and secures (couches) the thread. (See Machine Quilting Made Easy!, p. 41--Exercise 13: Learning to Couch by Maurine Noble.)

Bobbin drawing uses the same machine set up for the top thread but the heavy thread is in the bobbin. Loosen the bobbin thread tension. Turn the quilt over so the back is facing up. As you stitch and see the top thread, the bobbin thread will be drawn up to the front surface of the quilt.

Decorative threads I've used include: Superior Thread's Razzle Dazzle, Rainbows, King Tut, and Glitter; Yen Met Metallic, YLI Variations, and hand dyed perle cotton, chenille yarn, etc. These can add a special sparkle to wall hangings and novelty quilts. Give them a try!

Copyright ©2008, Sharon Baggs

Saturday, August 2, 2008

Threads for quilting

This is a broad category that contains plenty to meet the fiber needs of quilters today. The threads I choose for a bed quilt will be different from what I choose for an artistic wall hanging. In addition to thread, many art quilts employ the use of yarn, beads, metal, and found objects as an example of mixed media. But thread is used in virtually everything quilted. Here's what I use in my beginning quilt classes and for general quilting:

Sew Art Monofilament Nylon Thread--when stitching in the ditch I stand a cone of this at the back of my machine for the top thread and use a cotton thread in the bobbin (Presencia 60/3 or 50/3) to anchor all the horizontal and vertical quilting lines. Also great for outlining applique' pieces. Beginning quilters may find this easy to work with while learning the process of free motion quilting--any bobbles and wiggles are easily disguised.
http://www.sewthankful.com/media/SewArtThread/InvisibleNylonBlackSM.jpg
Presencia 50/3--excellent choice for quilted items that will be washed regularly. The 60/3 can also be used for fine heirloom quilting when stitching lines are close together (1/2" - 2"). The 40/3 is also suitable for quilting lines that are further apart and it works well on flannel.

Superior King Tut--beautiful for quilting open feather designs, this 40/3 cotton variegated thread changes color every inch or so. I use Presencia 50/3 in the bobbin so the resulting thread application doesn't look or feel too heavy. Choose a bobbin thread color that will blend with one of the variegated thread colors on top.
http://www.hancocks-paducah.com/ProductImages/Large/st12101948.jpg

Copyright ©2008, Sharon Baggs

Thursday, July 24, 2008

Threads for piecing


Thread is addictive. I love the colors, textures, and different applications for using them--piecing, quilting, and embellishing.

When piecing a quilt consisting of cotton fabric, I stick with cotton thread. Especially for quilts that will be washed regularly, such as bed quilts, cotton on cotton is a solid fiber marriage for the long haul. Use a quality thread--avoid short staple cotton threads. These may seem fine but they contain slubs and are weaker than a long staple or extra long staple thread.

A quality spool of cotton thread will cost less than a yard of fabric. My favorite piecing thread is Presencia 60/3. It is available in 600m spools or 125 gram cones so you can piece forever!

The image “http://www.presencia-usa.com/Graphics/PresenciaUSALogoHeader.jpg” cannot be displayed, because it contains errors.

This 60 wt. 3-ply thread is fine yet strong. When aiming for an accurate 1/4" seam, this thread yields both precision and strength. A taupe or light/medium gray works well with most fabrics. Presencia 50/3 thread, available in 182 solid colors, is also excellent for piecing and quilting. Try sewing a seam with each of these threads and compare the difference.

Pictured below from left to right: a 125 gram cone of 60/3; a 500m spool of 50/3 and a 400m spool of 40/3. When sewing binding on a quilt, I machine sew the double fold binding edge to the front of the quilt with 60/3 thread and hand sew the fold to the back with 40/3. This is the recommendation of Harriet Hargrave and it gives a strong finish to the quilt edge.


A popular choice for piecing is Aurifil Mako Cotton and Superior's MasterPiece, both 50/2 threads. With just two plys it's important to shorten the stitch length on your machine to insure strength in the seam.

With 60/3 thread you get the benefit of an accurate 1/4" seam without adjusting the stitch length. Also the 3-ply thread has about 50 more twists to it, adding to its strength. For this reason, Presencia's 60/3 is my hands down favorite piecing thread. Check out their full line of quality threads at www.presenciausa.com

A fine polyester such as Superior's Bottom Line or So Fine may also be considered for piecing projects that are not bed quilts. Wall hangings, miniature quilts, wearables, bags, crafts, etc. are perfectly suitable for using polyester thread. Again quality is important so look for the word "trilobal" on a spool of polyester thread.

Copyright ©2008, Sharon Baggs