Wednesday, September 5, 2012

Back to School

Summer was a blur of activity and not much quilting. I did, however, make a poster for the summer swim team final and used some of my meandering drawing skills, learned from quilting, to fill in the letters.


Doodling is so helpful in teaching hand/eye/brain coordination when it comes to sitting down at the sewing machine to free motion quilt. I like using a white board so I can doodle and erase. Try it as a warm up and you'll feel more confident with the needle and thread.


Now it's back to school! Which means I have time to pull out all the fabric stored in various places and really see what's there...plan projects...organize...

Here's Baby Squid on her first day of high school! It was orientation day yesterday for the freshmen and today everyone is back.


I'm looking forward to being back into the routine that fall brings. In addition to school, Hannah is busy with running XC and rehearsing for a show at Northwest Children's Theater.


Becca started college a couple of weeks ago and is excited for this next phase of life. We enjoyed moving her into her dorm room and exploring a bit of Montana.


We got the lovely duvet cover (top bunk) from Ikea and amazingly her roommate chose similar colors. Really brightens up the room!


The summer was rounded out with both our anniversary celebration and Martin's birthday. Here we are enjoying some Red Velvet cake with our neighbors, George & Rae.


As the seasons change, I look forward to the beautiful colors of Fall and am reminded of walking around Seattle with Sarah and collecting leaves. I'll have to check out the trees in Eugene when we take David to school soon. Life is rolling along. Let's get back to quilting while we're at it!

Copyright ©2012, Sharon Baggs

Friday, June 15, 2012

Snow White Costumes


We recently finished a 2-weekend run of The Rockin' Tale of Snow White with Christian Youth Theater (www.cytvanport.org) Hannah was one of the 7 dwarfs. I made two plaid shirts for the smallest dwarfs...Hannah as Tip and Kyle as Big Mike. He was everyone's favorite!

In addition, I used this pattern and fabric...


to make these Bo-peep dresses for Emily and Madi:


I really enjoyed being on the costume committee for this show and working with these two ladies: Lowanna (our costume chairman) and Anne (the director & costume shop coordinator).


Copyright ©2012, Sharon Baggs

Wednesday, June 13, 2012

Twins arrive!

So happy to announce the birth of Kinsley & Kate on the day of my last post, June 7. I knew mama was in the hospital that day but had to keep my lips sealed until they were born. We're thrilled and thankful that they were delivered safely. Looking forward to visiting them now that they are home!

Thursday, June 7, 2012

Quilts delivered!!


A finished quilt is always a cause for celebration. In this case, it's two quilts for twin girls. Still waiting for their delivery but it's so close I can feel it!


Meanwhile, here's a look at the nursery. Kellie's mom painted this beautiful tree with a purple flock on the tea green wall.


I love this bookcase made from an old wooden pallet board. An awesome idea!


Such a special time to visit with Kellie a few weeks ago and to share these quilts with her. She is almost 37 weeks and ready, ready, ready to have and hold her twinkies.


Copyright ©2012, Sharon Baggs

Friday, May 18, 2012

Pinwheel quilt: sashing & borders

With the utility stiching-in-the-ditch completed, it's time to show off some stitching on the surface of the fabric. Although these are twin quilts, they are different, just like the girls will be. First off, I  stitched these novelty blocks with a straight grid design, while the other novelty blocks had a quilted echoed pinwheel design (see previous post).


Also shown on this block are the wavy lines quilted in the green sashing strips. I did this by choosing #4 stitch on my Bernina 153 and elongating the stitch length to about 3.5, which automatically made the wavy line design. Use the walking foot and your wide stitch throat plate. As each wavy line is completed, reset the machine to a straight stitch and travel in the ditch to get to the next part of green sashing and reset to the wavy line (my machine remembers the previous set-up at the touch of the button).

The pink inner border has free-form quilted loops, requiring feed dogs to be down on the machine and a free-form quilting foot. I use the open toe foot #24 for best visibility.


On the outer scrappy-pieced border, I quilted a meandering line and inserted random spiral designs.


A look at the back shows the quilting. The same fabric was used for the binding.


The other quilt has a different green sashing with a marked ocean wave design. A gray inner border features the same wavy line using the Bernina #4 stitch, with the elongated (3.5) stitch length.


The outer border was also quilted with a meandering line but I inserted six-spoked stars throughout.


A soft green flannel with daisies backs the second quilt and I used the same hot pink binding as the first quilt.

Copyright©2012, Sharon Baggs

Wednesday, May 16, 2012

Happy Birthday Sarah!


Today is my oldest daughter's birthday. She is away from me as she turns 23, serving with the Peace Corps in Indonesia. I remember the day she was born, just after Mother's Day when I was overdue with her and so anxious for her arrival . We didn't know if our baby was going to be a boy or a girl. It had been over 40 years since a girl was born on my husband's side of the family, so we were thanked many times when they heard the news. A joyful memory...and we got our boy two years later!

Copyright©2012, Sharon Baggs

Tuesday, May 15, 2012

How to quilt a pinwheel block

After the quilt is layered and pinned, the first step to secure the layers is to quilt in-the-ditch. It seems self-explanatory but at first I really didn't know what this meant. A stitch-in-the-ditch is a stitch taken into the seam line, that hidden place where two pieces of fabric are joined by stitching when piecing. By quilting into the seam line, the piecing stitches are being locked-in and secured. This is what it looks like:


Begin with 1/4" of small stitches to secure the beginning, then stitch on one side of the sashing strips, pivot the needle to stitch in the ditch across the bottom and quilt up the other side, and tie off the thread with another 1/4" of small stiches. I did all the inner sashing strips before quilting all the way around the perimeter, still in the ditch between the blocks and inner border.

In addition to stitching the layers together, the ditch also provides a means for travelling from one point of quilting to another without having to stop and start a new line of quilting. This is very helpful when quilting the blocks.

I tried googling "how to quilt a pinwheel block". All I got was piecing instructions, which is not the same, so let me share a couple of ideas on how to do this. I quilted the pieced pinwheel blocks by stitching-in-the-ditch. Quilting between the seamed pieces from one corner to the other, pivoting and stitching in the outer edge (ditch). This is basic utility stitching that works well. Another option would be to quilt some free form swirls or a curved arch on each piece of the pinwheel to create some movement. This can be done in addition to, or instead of, stitching-in-the-ditch.


To keep a consistent design that will show nicely on the back, I decided to quilt a pinwheel design on the novelty square framed block to echo the pinwheel block next to it. When I did this I also used blue painter's tape, a very low adhesive tape that provides a guide for quilting straight lines without having to mark the fabric. Use an acrylic ruler to find the center of the square and lay the tape alongside it.


Begin stitching at the edge of the center mark, being careful to stitch next to the tape but not into it.


Travel from the side edge to the corner by stitching-in-the-ditch.


Remove the tape and position it on the diagonal. Keep the needle in the down position while adjusting the tape, then pivot in line with the tape. Stitch from the corner to the opposite diagonal corner.


When you get to the final line, check to make sure your tape is positioned right where the threads have been quilted in the center, then adjust the tail ends of the tape to the corners.


When you're finished, it should look like this:

 
Copyright©2012, Sharon Baggs

Monday, April 16, 2012

Baby, we're ready to quilt!

Baby quilt #1 is pin-basted and ready for Bernina's golden touch. I'm using Hobbs Heirloom 80/20 for the batting. It's 80% cotton with 20% polyester, which makes it soft yet durable. A perfect choice for baby quilts because they do endure a lot of use. That's another reason I quilt baby quilts more heavily. Rather than quilt an all-over design across the top, I like to begin with stitching-in-the ditch and make sure the seams are quilted in. Then I apply some free-form quilting to the open areas. I'm so excited to get started!


For the thread, I chose Superior Thread's King Tut 40 wt./3 ply extra long staple cotton (www.superiorthreads.com). I love the variegated colors with a 1-inch color change. For the top thread I'm using color #956--Angel Pink and for the bobbin thread #940 ELS Cotton Candy. The top thread is lighter and will work best for stitching-in-the-ditch. When I get to quilting the open areas, I'll probably use the same cotton candy color thread for both top and bobbin. The pinks and lavenders will look great on this flannel backing fabric from Timeless Treasures.


I'm hoping to get a lot of quilting done this week. Hannah just got cast as a dwarf in Snow White with Christian Youth Theater (www.cytvanport.com) and I know I'll be busy helping out on the costume committee by this time next week.

Copyright©2012, Sharon Baggs

Thursday, April 12, 2012

Quilts Coming Together!


Week 2 of working on the Pinwheel quilts for the twins and they are coming together nicely. This one has the bright pink accent strip, separating the blocks from the pieced border.


The second quilt has the light gray accent strip, with the border construction in progress. The bright pink in the pieced border gives it some pop.


Copyright©2012, Sharon Baggs

Wednesday, April 4, 2012

Pinwheels for two

I'm working on two baby quilts that will be almost identical except for the sashing. I'm using different green fabrics to separate the blocks. Here's a look at the first row. I have to arrange each row to check the placement of the cornerstone sheep.

The pinwheel blocks are pinned to the sashing and ready to be sewn. The red hearts are Fons and Porter markers that are very helpful for keeping things in order.


Here's the pinwheel block with sheep cornerstones and the framed novelty block. The quilt will require 8 pinwheels and 7 frame blocks.


I'm happy with the green sashing and the gray in the pinwheel. Glad I switched the colors :)

Copyright©2012, Sharon Baggs

Tuesday, April 3, 2012

Playing with Pinwheels

I'm back in the saddle. Now that Sarah has left for Indonesia with the Peace Corps., I'm getting back to the sewing studio. Here's what I'm working on this week:


The three blocks are a mock-up of my design of framed blocks and pinwheels. I decided to reverse the gray and green, so the pinwheels will be pink and gray from the half-square triangles. The sashing will be green. I'm fussy-cutting the sheep for the cornerstones. Except for the green fabric, the featured fabric is Farm Yard Friends from Studio e fabrics (www.studioefabrics.com).

Sarah left Saturday for Washington DC, her first stop before heading to Asia. Here's the family at PDX:


Copyright©2012, Sharon Baggs

Tuesday, February 14, 2012

Happy Valentines Day!


Trapuntoed Heart with Cross Hatching and Diagonal Lines in Background

Copyright©2012, Sharon Baggs

Sunday, February 12, 2012

Quilting Samplers


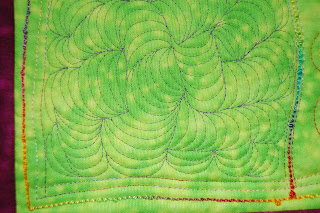
Over the years I have made several samples of quilting designs. Some of these I have learned from teachers such as Harriet Hargrave, Diane Gaudynski, Sue Nickles, and Maurine Noble. Others designs have been developed from my own doodling. I keep a sketch book handy to draw out interesting line designs I see in ironwork, buildings, and signage. There is much to see and record if you look around.


When I was teaching beginning machine quilting, I used Maurine Noble's book Machine Quilting Made Easy. It's a great starting point, affordably priced, and is probably in it's 30th press run by now. I had been quilting for awhile when I had the opportunity to take class from Maurine. Although not technically a beginner, I certainly learned a great deal from her because she was the author of the book and there's those little things gleaned from her experience that I really treasured.

Here's the sample I made from Maurine's book and used to teach from her book:


Another teacher who came to town was Harriet Hargrave, the godmother of machine quilting. She taught me the importance of excellent mechanics, such as precision piecing, fabric care, batting choices, and choosing a quilting design to properly compliment the quilt's style. Through her I came to love stencils and saw how a simply quilted grid on a traditional style quilt is often the best choice. I love to quilt grids, such as these:


About five years ago, I went to Harriet's Machine Quilting Celebration in her hometown of Denver, Colorado. There I took class from Diane Guadynski and learned some of her exquisite free-form designs, such as Bouncing Bananas:


Eventually, I designed a sampler that incorporated the use of free-form designs, stencils and grids, along with the mechanics of stitching-in-the-ditch. A quilt using stitch-in-the-ditch, along with a simple grid can be an excellent choice for providing good integrity for the quilt and making it last through wear, tear, and washings.


Hanging your samplers near your quilting area will help spark ideas when deciding how you desire to quilt your quilt!

Copyright©2012, Sharon Baggs